Thursday 30 January 2020

Empire Day, the result

Now that I've had a little bit of time to think about it; it went all right. I didn't have the new glasses, and the mask needed more trimming around the eyes to make wearing any glasses comfortable.

Four layers were two layers too many. I regularly had to step outside to cool down, even after shedding the raw silk coat and the scapular shortly after arrival.

One of my Santeria necklaces died; I'm not sure if the spirit they were dedicated to was annoyed with me, or if the twenty-years+ thread they were strung on just had enough and broke. Either way, I think I salvaged most of the beads.

Overall, the clothes worked. Though I felt very fat and my trousers and the skirt kept either riding up to my bra, or trying to fall down to my arse. I have no waistline worthy of the name. Meh.

Tweaks, more tweaks. I need to stop having squirrel moments and actually fix the things that're bugging me about Seppa's kit.

Anyway, photos ahead, by Paul Wilder of Violet Illuminations, who hosted the Empire Day player event. Due to no flash and low lighting, some of the images aren't well-focused; this is not a criticism. I have trimmed them to exclude others as much as possible, in part to protect their privacy, and to focus upon Seppa's costume with fewer distractions.

These were chosen strictly for me to see Seppa's costume in ways that I otherwise couldn't know.

Rear view, because it's good to see how stuff worked out.
I do like the dog in the next picture, though I think she had difficulty recognising me with the mask on, because she wasn't sure about me at first. I like to think that she recognised my voice and scent. She wasn't so happy with some others and barked and growled at them.

Gotta pet those who want to be petted.
The satchel definitely needs some work, from shortening the strap by almost a foot, to adding some patches and stains to it, because it's very dull at the moment.

Curiously, as it currently stands, Seppa isn't much into leather, all of my efforts to bring in more leather into eir overall look has ended in failure. Pouches, belts, sure. But nope on the warskirt at this time. Maybe it'll change once I'm at Anvil and with other orcs.

Empire Day was hard, because orcs don't do things solo, and Seppa was all alone amongst the humans.

Wednesday 29 January 2020

Another distraction...

This time, the distraction comes in the form of a Peruvian baby sling in the British Museum.


The colours are in the right range and it's a beautiful woven item. However, the main reason it caught my attention was due to the little carved ornaments. Which, according to the blurb, make a soft sound to soothe the infant as the carrier walks and moves.

Here're some closer looks at those ornaments. They look like bone to me, but they could also be made from shell. The blurb doesn't specify the ornaments' material.


Aren't they beautiful? I like how each one is unique, in pattern as well as their size and shape. Some look older, some newer. Some might have come off, and newer ones made to replace them. All that time spent for a baby, or maybe a series of babies, maybe the baby carrier was passed down through carrier to baby. Maybe when the textile wore out, the wearer would transfer the old ornaments to the next carrier.


So many questions, but no answers.


It gives me ideas for how a shaman might wear bones that don't look so... bony.

Sunday 19 January 2020

Where's my home?

I was going to write about the Tibetan Panel Coat, but I've gotten distracted by reading PD's Empire wiki. Specifically, the one land of the Imperial Orcs: Skarsind.

I'm playing at player events as my Imperial Orc, and I am most familiar with the Brass Coast because that's where I spent two years. So a bit of bleed from the player means that Skywise Seppa is spending at least part of the winter in the warm lands of the Freeborn. It also means that I can use some demurer sari scraps for fabric patches on Seppa's clothes.

I'm not familiar with Skarsind, so I've been reading, and rereading, and rereading again, about that region of the Empire. Partly due to dodgy memory, and also because I'm trying to grow familiar enough that I don't sound (and feel) like a clueless twit when someone asks me about Skarsind. I also feel that I need to decide where Seppa spends the majority of eir time, ie 'where's my home?' Something caught my eye in the Estermark area of Skarsind: The Weavers' Market("TWM").

I posted in the Imperial Orcs group about a potential player event set at TWM; and one of the persons who came up with TWM said that they had considered a player event, but they're too busy to make it happen. I was thinking 'it needs to be up north, where it's rocky and forested' and it happened to coincide with their thinking, which was they wanted to do it in the Lake District. I was thinking of the Peak District, simply because I've been there. Maybe a trip to the Lake District will take place sometime this year to help me better visualise TWM.

Regardless, the idea of a player event set in TWM will have to remain unfulfilled for now. I don't have the knowledge or skills to organise a player event; and the creators' ideas was a little bit different to my idea. They wanted a social with monster hunting and pit fighting (which is perfectly orcish). I was in the mind of 'invite players who are sewers and costume makers who have brought their wares up to TWM to IC-trade' but also socialise and maybe acquire, trade, or sell, lengths of fabric (which might be my Freeborn bleed).

For me, writing turns over ideas in my head. I just had another thought: since TWM also involves the trade of mana crystals and mana sites, could there not also be a discussion or a series of discussions about orcs and magic? Maybe a small delegation of Urizeni mages and magicians from other nations of the Empire to come and teach how magic could be done?

Perhaps too ambitious, perhaps it would need to run from Friday evening until Sunday afternoon, if I wanted the magical discussions, alongside the trading market and craft-doing, and the monster hunting and pit fight and the social, with its thundering drums...

A person can dream, no?

Thursday 16 January 2020

Empire Day

Below are the last minute images on the day.


Decisions, decisions!
Side note: I didn't use the boxers wraps or the grey felt winingas/leg wraps.

Neck tat.
Sadly, my brown and white Santeria necklace self-destructed at the event, part way through said event. I'm not sure I saved all of the beads.

Racing out the door...

I ended up shedding the scapular and the raw silk coat and retained the tunic the linen-cotton hooded coat. I also kept the blue skirt, but I think it will only appear on dry weekends and player events.

Soooo many... too many... layers.

I would like to add that Seppa finally started talking to me at the player event, quietly, not very much, but ey started telling me what ey like and dislike about what I'm doing. I hope that ey will continue, so that I don't feel so useless.

Wednesday 15 January 2020

stitch-stitch-stitch!

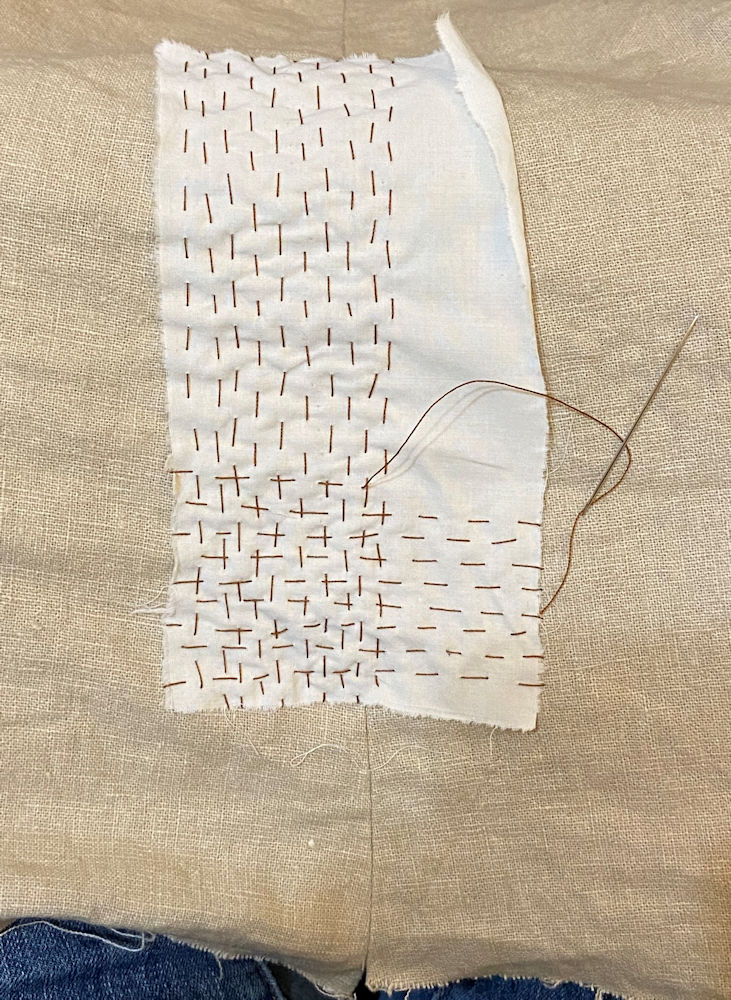
One of my hand-sewing inspirations for Seppa's garments comes from this image of using coloured threads in a running stitch from vertical and horizontal travel. It's organic and rustic, but functional. I also drew inspiration from Japanese boro with its distressed fabric scraps layered and stitched; though boro is generally tidier than my meagre efforts, I'm enjoying it for its mindfulness.

When I'm cutting fabric for making clothes, I save my scraps to test the sewing or serger's tension for the fabric, before I begin sewing on the garment itself. This means I often have more scraps than I needed for the test sewing, so having another outlet for use of the scraps is helpful.

The striped browns fabric has a small amount of synthetic, but appears to be mostly cotton. I picked up eleven yards of this stuff because it was either 50p/m or £1/m and I liked the woven stripes in it.

Backstory

I have a favourite hoody, it's a thick cotton (either 100% or 95%) that has acted as a windbreaker on many occasions and I wear it nearly every day since 2013. Because of this, there's wear at certain locations, one of them is the underarm-to-wrist sleeve seam, especially at the wrist. I'm using it to inform where I add patches of fabric to the linen-cotton hooded coat.


Deciding on threads and placement of the patch.

I went with top-stitching thread, because it's thick and visible, though it unravels with vexing frequency, so knotting at the end becomes a trial if I tried to use up as much of the thread on the needle as I can manage. The top-stitching thread also has a slight sheen on it that's a bit more than regular or extra strong thread.

In progress...

In the above picture, I've placed the patch over the sleeve hem where it joins the underarm seam. When I've worn the coat, that part of the sleeve, on both arms, likes to catch on things; this informed me of where to site the patch, as it would have worn or torn in that location.

The inside view that wouldn't normally be on display.

One never knows when someone else might glance at one and see the inside of garments, and so I've made some of those potential places visible with my work.

The two thread colours that I used.
When I ran out of what I had on the needle, I took the other thread colour and carried on. So the stitches are two very slightly different colours. I need to do that more often, pick two or three thread colours and not load on too much thread, and swap them to make the rustic, organic look into something authentic.

"Oh, I ran out of that thread, what else do I have to finish this particular patch?"

Some of my later patches forgot this idea. I need to return to it, so that rustic authenticity remains present.

Use those scraps!
The egg-blue stripe cotton scrap is from my tunic. I didn't bother with the crossings with it at this time, but I might at some later moment, because 'kit upgrades'.

This is how this section ended.
One thing that I forgot to do before the patches is that on the other sleeve, like the hood, I have some simple running stitches along those edges to stabilise the lining edges from rolling or moving too much and showing.

I now call the left arm sleeve "eye-sleeve".
I rectified my forgetfulness of the running stitch along the left sleeve hem by adding the running stitch and then burying the ends inside the patch.

Also, one might notice that the premade shisha ring dye-bled on the surrounding threads and fabrics. I came away from visiting a smoker; their secondhand smoke made my coat reek, and I didn't want my costume to continue to make me ill, so I had to wash the machine wash coat. Yes, I know, what a chance to take, machine washing a glass mirror. I put the coat in a sweater-washing bag to shield the mirror. I will have to find another way to neutralise any further tobacco odours.

I think on Friday, when I had the day 'to kill' at my host's home, I added another patch, because what better way to make use of downtime with limited resources? I did have the foresight to bring my sewing kit and a big bag of scraps with me to draw from so I knew that I could do something productive.

Some of my tools. Yes, milliners' needles.

Outside of the right sleeve.
Like much of the rest of my costuming, I had scraps of the IKEA cotton calico that I had dyed "coffee brown" and used for the linen hooded coat's lining. I snipped, then tore the rectangle of fabric, though one edge is still tidy because it was a cut edge. I did use different coloured threads this time.

The view from the inside of the sleeve.
This was the end result:

It worked for me.

Yesterday evening, I came across two very old (nearly twenty years old?) and worn John Lewis pillowcases that I'd set aside in the scraps bag, instead of putting it into the textile recycling. They're the right colour for Skywise, so I easily tore a piece from one of them and applied it over a side seam towards the bottom, but not at the bottom. I'm still trying to decide if I'm going to hem that bottom edge of my coat.

Big patch

I listened to the TV whilst doing this, it took me three or four tries to get it situated where I wanted it. I was thinking about what I was going to do, and didn't grab some safety pins or pins to keep this in place before I started the running stitches.

Finished.
I think this particular patch took me about two hours to apply. Admittedly, I suffer from SQUIRREL! So that might partly explain why it took the time that it did.

The pillowcases will make a good addition to the fabric-scraps-for-patches, for that authentic, rustic, random effect.

I didn't use top-stitching thread for this one, I used the extra strong thread. I also didn't change colours, so another patch with two or three different threads might appear layered over this one.

Future patches:

I want to make a small painted Skywise wing patch, about 10cm tall, to apply to my coat's sleeve. I also want to carve some stamps and use paint to make some painted patches of the Virtuous animals, so that I can add them to the sleeves too; and a horse.

Hint of a near-future sewing and Seppa project...

Something that I've wanted to make for the past twenty, maybe closer to thirty years...

A Tibetan Panel Coat.
My desire is to start tracing or cutting the panel coat next Monday.

Tuesday 14 January 2020

Leather belt work

This belt is incomplete; but it's nearly completed. Last week, I got the opportunity to work with Galla's Emporium to progress the belt for the Empire Day player event at the weekend, as I needed a more reliable and more IC-belt than the Fat Face belt I used in November.

Backstory time!

Thirty or more years ago, I made a belt for myself, to hold my chainmail off my shoulders and displace some of the weight to my hips. I was considerably thinner back then, so the old belt no longer makes around my waist (I'm working on the weight thing). When I made that belt, I designed some knotwork patterning and then carved and stamped the belt with the knotwork. I forgot to take a photo of the original, so don't ask, it's difficult to photograph.

Present day...

I wanted to import that knotwork to the new belt. Galla created a new, larger, and tidier, version of my original. She then transferred it to some tracing film, so we can reuse it on other leatherwork in the future.

Design copyright ©1987-2020 Kshni and Galla's Emporium
And yes, the obnoxious text across the image is my attempt to dissuade design thieves; come up with your own designs for once!

I confess, this was the moment I realised Galla has pretty fingers.
Onward to the carving!


I think we ended up mixing the segments sequence from the original, but the enlarged design did work nicely on the belt.

OK, I might be a little mixed up, this might have been part of the transfer stage, rather than the later carving stage.

Carving completed, we head onward to the bevelling to emphasise the carving.

Bevel stamping brings out the details.

From a different angle :)

I'll see about adding a picture of the dyed stage, but the truth is that the dyeing stage isn't complete. We ran out of daylight and the workshop grew too cold to do much more with the belt. It's on the list of things to finish for April, but it will suffice for now until things are a little more settled.

Thursday 2 January 2020

Boots

I'm mulling over ideas for covering my tactical boots, I still want to go with some sort of gaiter, but secured by an internal strap the boot laces pass through to keep the gaiter from wandering around my lower legs and causing problems.

I don't want to put grommets or change the boots, as they were purchased specifically to go through security without requiring removal. In other words, they don't have metal in them.


They're finally getting broke in enough to be comfortable in the field. They're not waterproof to survive Anvil's mud, so I will need to alter a pair of wellies for those times the field turns into a quagmire. But for the battlefield and non-quagmire events, these will be my primary footwear.

The heel gap isn't very much, which is why I think a stirrup will probably collect clots of grass and mud. The slant of the top of the boot and the padding is visible, and why I was talking about the pivot or lever with rigid materials such as steel greaves.

Wednesday 1 January 2020

It serves no purpose... except...

In a way, it does have a purpose because it securely holds and displays an item-of-worth that my character either found or inherited (I haven't yet decided).

Still playing with ideas for placement.
One might recognise a similar picture to the one above, as I played with ideas for use of the three-decades-old silvery dome buttons that were originally on a black leather strap by Daedalus. I wanted to give them function and purpose again, but I didn't want the black strap. However, the black strap was instructive for securing the buttons that didn't bulge the leather in odd ways; thank you, Daedalus.

Before and after polishing.

Months ago, I ordered these 'vintage' stamped and domed buttons from Shaila.de I liked the pattern and had no idea what to do with them at that time. I also under-utilise my Dremel, so I equipped it with a buffing head and some rouge, and went at these buttons. The shiny one was after the buffing, the dull one is how they were originally. I lack experience, so I'm sure I made mistakes with buffing, but I was satisfied with my results.

I ended up using only one of them for this project, but I'm sure I can find purpose for the other button somewhere else.

I applied the domed buttons, both the embossed and the shiny ones, onto the strap, along with some rivets to help hold it together. A bit of latigo leather lacing...

Visual testing of concept.
I had some small stamped, pronged oval discs in my stash; I've had these probably for thirty years as well, waiting for a purpose. So I gave one of them a purpose.

I am satisfied with how the sheepskin strap turned out, and I will be getting two more to go with it, so I can place more of the silvery domed buttons, and maybe that second Shaila button somewhere on display.

They won't be crammed together like this when it's time.
One will notice the antler needle case, I still haven't added the felt plug for needles.

I need to figure out a better method of securing the wooden beads tie-back from John Lewis and the charity shop restrung beaded necklace, the pewter coloured rings are a bit too modern. I suspect the tie-back and necklace will end up with leather lacing or artificial sinew fixing them to their D-ring straps.

The Skarsind axe head medallion... I think I will string some wooden beads on the cord with it, to give it a little something extra.

The wooden bottle is back. It has so many purposes, just as it is.

Things to do:
  • Antler case wool plug.
  • Tie-back and necklace on a better connection to their D-rings.
  • Finish tooling and staining the belt.
  • (there are several other things to do as well, but I've listed here the tasks related to this post.)


Belt & straps

I might end up doing several posts in a row, to divide the work that I've been doing for Seppa's costume.

For this post, it's about a belt, particularly this belt...


...and the straps for hanging tat, and maybe even a weapon or two at some point.

Galla helped me by cutting and dyeing/staining the straps; and I did the rest of the work.


I ran the straps under the tap so that I could shape them around the D-rings for a closer fit to the ring, and the belt.


I then used clothes pegs to hold the straps in place so the straps could shape themselves around the D-rings and belt. I don't have to worry about leaving impressions on the leather because... orcs.


I punched the holes with a tool for punching four slits at a time, or the other tool that does two slits at a time. I followed that by using two leather needles at the same time to sew the D-rings and the belt loop. I got two straps finished and then broke the two needles at the eyes. I moved to thicker needles and those survived stitching three more straps. Galla cut six straps, but I needed to rest my fingers and let them heal, so only five are currently completed.


After the stitching, I bashed the stitches with a few strikes from my mallet to help close the holes around the stitching to secure the threads.


OK, so the belt shaping got a little lost during the stitching and bashing. Those straps that got to dry overnight did take some of the belt shaping too.


The slit cutter isn't particularly sharp, so I sometimes eyeballed it and used my awl to make the stitching holes.

Yes, I know the D-rings are damn shiny, but that's the hardware that I had. I'm sure that they'll eventually soften, and if not, I'll try a careful application of some sort of corrosive to remove some of the chrome.

Next post covers another bit of belt-related tat. That post will have a picture of how I'm currently envisaging the potential future presentation.