Showing posts with label leather. Show all posts

Saturday, 7 March 2020

LARPCon 2020

What to say about LARPCon 2020?

Firstly, I arrived in a bit of a tizzy, but the old kit seemed to draw attention, and some of it sold, and on their way to new lives and purposes.

I found some leather skins that're ideal for the warskirt project, so whatever I made from selling off the old kit went to getting new bits.

I bought some of Steph's beautiful art and got to talk a bit with her and Alex, to smooth some of my anxieties.

Later, to quote Steph:
"...How cool is that to have something that you've gained actual worth on adventures."

I was writing about the brass chainmail rings that I acquired from Armchair Armoury and wanted to add said brass rings to an anchor wire chainmail collar an ex made for me about thirty years ago.

I thought at the time that she meant that I ought to wait on decorating Seppa and gain worthy things in play at Anvil.

Yet writing it now, I wonder if she meant that my thirty year old chainmail was an authentic relic of worth.

'Tis something to think about.

My haul

A black goatskin, some hairless sheepskins with felt very nice, even though they're greyish-brown/soil colour, and two brown remnants. They're destined for the warskirt, if I can figure it out.

Chainmail on old suede leather.
I found the photo I recently took of the chainmail collar. Perhaps once it's remounted onto something better, I can use it for the neck cover.

The brass rings, a Wintermark Rune, and a pin from Steph.
I have yet to try the brass rings with the galvanised anchor wire. I will need to remount the collar onto something a bit better, as the suede is a bit stiff and showing its age.

The Wintermark Rune is 'Sular' the rune of discovery and is affiliated with the Day realm.

Yes, that pin is inspired by Studio Ghibli and Princess Mononoke.

Other stuff

I'm continuing my sewing efforts with Seppa's panel coat. I'll discuss it in another post.

Sunday, 9 February 2020

Seppa's coin pouch

Here's the promised post about the belt pouch for coins.

I caved and purchased Tandy Leather's 'Winsor Belt Bag' kit; which comes with naked leather precut and hole-punched pieces, some black waxed thread, a large-eye needle, and a short black leather thong. I discarded the black thread and leather thong, because I didn't want that much black in Seppa's kit.

It does take some tricky counting to correctly make the bag. Also, we came to the conclusion that double-needle sewing method would be quicker and easier. Also, the thong wants to be longer if one wants to have some beads hanging from the thong.

About the size of the bag:

It's not so small that I can't stick my hand in there to fish out coins, of which, I'm glad to say, Seppa now has a few. I sold the one dose of liao that I had, for a loss, but I wanted to have a few coins for player events.

The pouch's tooled flap.
The flap carries several symbolic gestures and marks. The Varushkans have animals to represent the Virtues of the Way; from those animals, one can represent them as 'runes'. The rune on the flap is the Spider, who represents both Vigilance and Wisdom. The seven little tooled marks along the bottom are the Seven Virtues; this isn't how PD or other players represent the Seven Virtues, but I opted to express it this way.

Once Galla dyed the leather, I had a flash of thought, and grabbed her pear-shader tool and randomly bashed the dye-damp leather with the shader to add just a fraction more surface texture to the flap.

The pre-cut and pre-punched pieces, after we'd dyed them with saddle brown.
The saddle brown dye has stiffened the thin leather, but I suspect that once I start using it, that it will soften some.

I appear to be rather fond of this leather stamp.
The leather button for the pouch; it's the first thing stitched, and I had used the heavy waxed black thread to attach it. That's about when I decided I didn't want to use the black thread and switched to my brown thread.

A clever use of stamps to make a tiny eye.
We used 'mahogany' dye for the tooled leather portions of the bag.

The eye of Vigilance.
The image above shows where I diverged from the kit: I used dark brown waxed thread instead of the heavier black waxed thread that came in the kit.  I also used a brown thong instead of the black thong that came with the kit.

Belt loop, flap, and gussets. I put my PID on the belt loop in case the bag goes for a walk.
The next step involved the back of the bag; where we attach the belt loop and the flap at the same time. This is followed by securing the bottom of the belt loop to the back of the bag. After that, I sewed half the gussets to the bag back.

The blue mark is where my player identity number is, which is why it's covered in this picture.

Bag front, and the pleats with the tricky-for-me counting.
We returned to the bag front and here is where that tricky counting takes place; thank you, Galla, for helping me figure that out, because I would have gotten that wrong and it would have looked all wonky, and that would have annoyed me.

Pleated leather, that's new for me.
This is what the inside of the bag front looks like with the pleat. If I were to tweak the pattern, I'd stitch a 'binding' to cover the top of the pleat to protect it from wear.

Next stop, the gussets.
After the pleats to the bag front, I stitched the front and back together and through the gussets, which at first glance looks wrong, but as one has to return the way one came, it does balance out.

Gusset, oh gusset.
I heartily recommend reading through the instructions several times, and scrutinise the illustrations. They really were helpful.

Before I turned the bag right-side out.
It did take a little bit of effort and a dose of patience to get the bag turned; however, brute force is unnecessary.

The bag mouth... almost sounds like a monster, 'bag mouth'.
Here it is with the stitching complete. The bag is still slightly damp from the dyes, but I think that helped with the manipulation required to make the bag.

Side view!
Overall, it went together fairly quick, even with me occasionally having to remove stitches or restart a section.

Thanks, Tandy Leather.
I decided to take a picture of the completed pouch with the kit picture to illustrate how they compared.

Overall, I'm satisfied with the kit.
The combination of soft leather and tooling leather works well. I still want to try the bag body in deerskin or elk (if such should come available). I would also use a slightly thicker tooling leather for the flap, as the carving knife almost went through the flap's leather. I would double-strand my thread as it seemed just a little too thin as a single strand.

I do like how the tooling worked out, thank you, Galla!
Spider.
I'm calling the pouch 99% complete, because I haven't put the beads onto the thong. Otherwise, it is complete and ready to go.


Saturday, 8 February 2020

Leather belt work, the result

This past Thursday, I got together with Galla's Emporium to finish dyeing the belt. We also made a belt pouch for Seppa's coins or other small bits.

I digress, this post is supposed to be about the belt; the pouch is another post in a future date, come back if one wants to read about it.

Seppa's belt:

As one knows, we had tooled the belt with the twisting ribbons altered to fit in the width of the new belt and cleaned it up to make it easier to carve on future projects. We spattered some dyes across the leather, and dropped some tools on it to divot and ding the leather to give it that rustic effect. It wasn't completely finished, but it was sufficient for the time being, as I had two player events to get through before we could have another leatherworking session.


That's better.
We used a saddle brown dye over the top of it, and rubbed it into all the skipped areas, and allowed it to pool in the tooling to help emphasise them. The saddle brown also softened the black and red dyes we previously smeared over the belt. I'm satisfied with the result. We also dyed the sides and back, to help seal the leather a little bit more.


One knows I couldn't show off the pouch too.

I'll need to strike the belt against a boulder a few times to soften it, and rub in some beeswax, but the belt is otherwise ready to go.

Tuesday, 14 January 2020

Leather belt work

This belt is incomplete; but it's nearly completed. Last week, I got the opportunity to work with Galla's Emporium to progress the belt for the Empire Day player event at the weekend, as I needed a more reliable and more IC-belt than the Fat Face belt I used in November.

Backstory time!

Thirty or more years ago, I made a belt for myself, to hold my chainmail off my shoulders and displace some of the weight to my hips. I was considerably thinner back then, so the old belt no longer makes around my waist (I'm working on the weight thing). When I made that belt, I designed some knotwork patterning and then carved and stamped the belt with the knotwork. I forgot to take a photo of the original, so don't ask, it's difficult to photograph.

Present day...

I wanted to import that knotwork to the new belt. Galla created a new, larger, and tidier, version of my original. She then transferred it to some tracing film, so we can reuse it on other leatherwork in the future.

Design copyright ©1987-2020 Kshni and Galla's Emporium
And yes, the obnoxious text across the image is my attempt to dissuade design thieves; come up with your own designs for once!

I confess, this was the moment I realised Galla has pretty fingers.
Onward to the carving!


I think we ended up mixing the segments sequence from the original, but the enlarged design did work nicely on the belt.

OK, I might be a little mixed up, this might have been part of the transfer stage, rather than the later carving stage.

Carving completed, we head onward to the bevelling to emphasise the carving.

Bevel stamping brings out the details.

From a different angle :)

I'll see about adding a picture of the dyed stage, but the truth is that the dyeing stage isn't complete. We ran out of daylight and the workshop grew too cold to do much more with the belt. It's on the list of things to finish for April, but it will suffice for now until things are a little more settled.

Wednesday, 1 January 2020

It serves no purpose... except...

In a way, it does have a purpose because it securely holds and displays an item-of-worth that my character either found or inherited (I haven't yet decided).

Still playing with ideas for placement.
One might recognise a similar picture to the one above, as I played with ideas for use of the three-decades-old silvery dome buttons that were originally on a black leather strap by Daedalus. I wanted to give them function and purpose again, but I didn't want the black strap. However, the black strap was instructive for securing the buttons that didn't bulge the leather in odd ways; thank you, Daedalus.

Before and after polishing.

Months ago, I ordered these 'vintage' stamped and domed buttons from Shaila.de I liked the pattern and had no idea what to do with them at that time. I also under-utilise my Dremel, so I equipped it with a buffing head and some rouge, and went at these buttons. The shiny one was after the buffing, the dull one is how they were originally. I lack experience, so I'm sure I made mistakes with buffing, but I was satisfied with my results.

I ended up using only one of them for this project, but I'm sure I can find purpose for the other button somewhere else.

I applied the domed buttons, both the embossed and the shiny ones, onto the strap, along with some rivets to help hold it together. A bit of latigo leather lacing...

Visual testing of concept.
I had some small stamped, pronged oval discs in my stash; I've had these probably for thirty years as well, waiting for a purpose. So I gave one of them a purpose.

I am satisfied with how the sheepskin strap turned out, and I will be getting two more to go with it, so I can place more of the silvery domed buttons, and maybe that second Shaila button somewhere on display.

They won't be crammed together like this when it's time.
One will notice the antler needle case, I still haven't added the felt plug for needles.

I need to figure out a better method of securing the wooden beads tie-back from John Lewis and the charity shop restrung beaded necklace, the pewter coloured rings are a bit too modern. I suspect the tie-back and necklace will end up with leather lacing or artificial sinew fixing them to their D-ring straps.

The Skarsind axe head medallion... I think I will string some wooden beads on the cord with it, to give it a little something extra.

The wooden bottle is back. It has so many purposes, just as it is.

Things to do:
  • Antler case wool plug.
  • Tie-back and necklace on a better connection to their D-rings.
  • Finish tooling and staining the belt.
  • (there are several other things to do as well, but I've listed here the tasks related to this post.)


Belt & straps

I might end up doing several posts in a row, to divide the work that I've been doing for Seppa's costume.

For this post, it's about a belt, particularly this belt...


...and the straps for hanging tat, and maybe even a weapon or two at some point.

Galla helped me by cutting and dyeing/staining the straps; and I did the rest of the work.


I ran the straps under the tap so that I could shape them around the D-rings for a closer fit to the ring, and the belt.


I then used clothes pegs to hold the straps in place so the straps could shape themselves around the D-rings and belt. I don't have to worry about leaving impressions on the leather because... orcs.


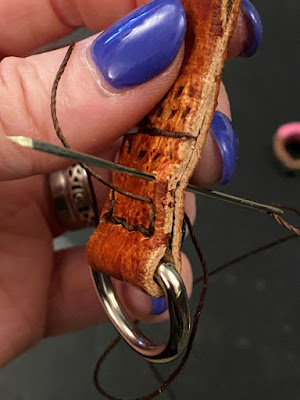
I punched the holes with a tool for punching four slits at a time, or the other tool that does two slits at a time. I followed that by using two leather needles at the same time to sew the D-rings and the belt loop. I got two straps finished and then broke the two needles at the eyes. I moved to thicker needles and those survived stitching three more straps. Galla cut six straps, but I needed to rest my fingers and let them heal, so only five are currently completed.


After the stitching, I bashed the stitches with a few strikes from my mallet to help close the holes around the stitching to secure the threads.


OK, so the belt shaping got a little lost during the stitching and bashing. Those straps that got to dry overnight did take some of the belt shaping too.


The slit cutter isn't particularly sharp, so I sometimes eyeballed it and used my awl to make the stitching holes.

Yes, I know the D-rings are damn shiny, but that's the hardware that I had. I'm sure that they'll eventually soften, and if not, I'll try a careful application of some sort of corrosive to remove some of the chrome.

Next post covers another bit of belt-related tat. That post will have a picture of how I'm currently envisaging the potential future presentation.

Sunday, 22 December 2019

Yet more kit.

It's all still works-in-progress, but it might entertain a reader of this blog to see another of the objects in their various states and conditions.

Seppa's belt.
The belt, it's still very pretty and clean and neat. It needs a bit of abuse and some stains and oils and waxes once I've finished tooling the leather. I might add the Varushkan spider on it somewhere. There will be some D-ring loops for it as well, so that I can hang some tat onto the D-rings.

Concerns

I do have them.

One that's been hanging over me is what I'm doing with my legs below the knees. I will wear my tactical boots, for the ankle support and that I can walk in them pretty much all day in relative comfort. Not as comfortable as trainers, but the trainers don't mesh with LARP and have no ankle support. I do have some metal-slats greaves, and I have padded canvas leg armour, but the tactical boots have a thick padded cuff that ends around the bottom of my calves, and that dead space between there and my knees, has me worried about how to adequately fill in that area so I don't harm my already wonky and fragile knees when the leg armour tilts on the boot top fulcrum and slams into my patellae. Leather straps around my ankles not withstanding, I'm too heavy for the greaves not to tilt into my knees.

I do have two pairs of winingas, or leg wraps, or puttees, all three names pretty much mean the same thing. They don't really work with the boots, and I'm again stuck with that dead space between top of the boot and the 15cm or so to my patellae.

Another option is a boot topper or gaiter, but there's that dead space again. I suppose I could have the gaiters made to knee height, and then stitch in a very thick padding to fill the dead space.

I'll have to ask the group to see how to get around it.

Side notes

I may have to make a few vertical pouches to hold the mana crystal cards and any herbs or resources that I have spare.

I think tomorrow, I will try to start drawing the lines-to-stitch on the coat so that I can add the Varushkan Virtue animals.

I'll be starting to plan out my 2020 bullet journal; my goals will be less ambitious, but perhaps more realistically achievable than the outright failure of this year. This is related to this blog and this character.

I will be listing my sewing patterns at some point, with which Empire nations they could best work with.

Friday, 4 June 2010

Old Costume bits

I found some of my old costume items, yay!

Laced black leather pouch - gifted to me by Otter. Black leather pouch and the carved leather belt - crafted for me by Daedalus Fortune (Leatherhead Regalia).


Detail on the laced pouch.


I did alter the laced leather pouch by adding these to it. Beads: comedy/tragedy; yin-yang, ankh, the rest are random beads, probably purchased at Friends in Louisville, Kentucky.


Soviet cloak pin, brass, purchased in the USA probably twenty years ago. Up until a few days ago, this was in two separate parts and one part was decorating a bag. I've found the second part and re-established the parts as one piece. I think it would do well on a hat.


I have misplaced the partner to this cloak pin along with the chain that once kept them together. Glass (plastic?) gems, copper metal. I probably picked this up in a thrift store.

Tuesday, 23 March 2010

costume, the clamshell purse

For my costuming, I always need a belt pouch, because pockets... just never seem to do... or the garment is one that does not lend itself to pockets larger than a £2 coin.

I have had this little leather clamshell purse for probably a decade now. I bought it when we were in Austria, either in Tyrol or Innsbruck. Can't remember how much I paid for it, but it was before the Euro currency launched.

Thankfully, I picked a teal green rather than black. Go me.

The pewter flower on the strap is an edelweiss.

The front:


The back:


Inner views and size reference:


I know these last two are somewhat blurry, but trying to get things in good light while holding it open just didn't go quite as well as I'd perceived. Still, they give one an idea of the size and how it looks inside.

It's pretty much just large enough to act as a coin purse, holding cash notes and perhaps a traditional house key. Car keys won't fit, neither will credit cards.

Wednesday, 17 February 2010

a steampunk - gaslight fantasy costume

As promised, some photos... I need to try things on but when laid together, they're looking very promising.


The original idea for the steampunk/gaslight fantasy costume. Black... lots of black. The skirt is from Chivalry Sports in the USA. The brass button jacket a shopping mall find (I just love it when the mundane shops have costume items!)


I was a bit dissatisfied with a completely black outfit. I started to dig, thankfully, my elder, bless him, poked and prodded my brain with questions and such. I recalled I had a long purple skirt. Here we go, let's break up that black!


Call this my 'mood board' for this project. The plaid background is a scarf I found in the mens' department of H&M. The chains are various kinds I found at B&Q (aka 'Home Depot' if you're in the USA) and are mostly brass with a little copper. The purple behind it all is my Fat Face skirt you see more of above.


A slightly cleaner view of the neckerchief... showing the plaid off a little better.


Possible ensemble: the Fat Face skirt, which is not floor length but it does reach down to the calves. The brass button jacket. The brown leather belt with the brass buckle, the black leather cuffs with pewter hardware and the plaid neckerchief were all from the mens' department of H&M. The black leather gloves are from John Lewis Oxford Street in London - I've had these for almost to fifteen years.


The bottles, one of these, perhaps two, of these darlings will become part of the costume. I'll be filling the bottles with goodies once they're chained. I intend to use copper or brass wire to create a cup and then the chains will attach to the cup and to the stopper and on up to the chain belt that I've been working on.


Crow and raven feathers, freely gifted to me as found whilst travelling. I need to find my quartz crystals and make a decision on which one will go into the hat brooch for the costume.

And no, I haven't photographed the boots or the hat yet, but soon!